Access Levels
A key feature of any software application is the authentication and authorization control
of users. In the Asp.Net Unique Architecture framework, you as a webmaster can plan user
activity. This is done by the user management module. You can easily divide their activities
by defining the roles and assigning users to these roles. Management of these activities is
done by granting access permissions to these users. With these permissions you can specify
which user has access to which part of the site. In simpler terms, it can be determined which
user has access to which parts and which parts are out of access to him. This module makes
users feel secure. Asp.Net Unique Architecture framework has high power and security. Security
is the key part of any software. In the AUA framework, the security team of Hilton Software Group
has been able to ensure the highest level of security by trying and reviewing similar products,
which does not have much overhead in terms of performance.
An important and interesting point in the AUA framework is Authentication and Authorization,
which can be easily expanded and controlled to the smallest level of actions.
There are different models of Authentication and Authorization in the AUA framework, which can help easily specify the access level in the controller and action.
1. WebApiAuthorize: Using this attribute, you can specify access levels for the action and controller.
2. AllowLoggedInAuthorization: The user just needs to log in.
3. OnlyLocalActionAuthorize: This attribute is for actions and controllers that only need to be called locally on the server.
4. AllowAnonymousAuthorize: Any user can have unlimited access to this action and controller.
5. IpWebApiAuthorize: Using the IpWebApiAuthorize attribute, access to a range of IPs can be restricted.
6. OnlyHasAccessTokenAuthorization: The user only needs to have access to the token.
WebApiAuthorize
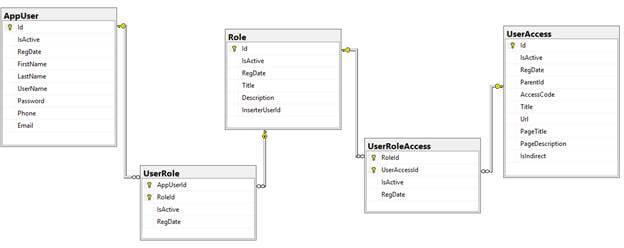
To use the WebApiAuthorize attribute, you must add an item for each control or action in
EUserAccess. In the database in the UserAccess table we add the name, access number, description
and URL.
To use the WebApiAuthorize attribute, just type it on the controller or action. For example,
access to the following action is limited to users who have AppUser = 1 access.
[WebAuthorize(EUserAccess.AppUser)]
The WebApiAuthorize Input can have several access levels such that if the user has one of the
accesses, he has access to that resource. The title of the pages is loaded for the page by
default according to the description in the UserAccess table.
User Access in youtube More videos
User Access in youtube More videos
AllowLogedInAuthorization
There is access for users who have just logged in and have access to their activated or unexpired token.
OnlyLocalActionAuthorize
This is used when an operation should be performed locally and usually for a limited number of times, for example, when sending a series of data to another server.
AllowAnonymousAuthorize
This is available to all users of the site. In other words, there exists no control over its access, for actions like Login.
IpWebApiAuthorize
When IP access is restricted and does not require the Login, only one IP range can be accessed; for example, servers within a network that can see each other do not need to login and get tokens, and any request from these servers is recognized as valid. This is useful for sending data between subsystems.
OnlyHasAccessTokenAuthorization
This type of access is used when the user only needs to have a token with the correct structure and the expiration time is not considered. For example, the LogOut action is of this type. To release the resources, all you have to do is to send the token and release the resources, and there is no need for other controls on the access token.
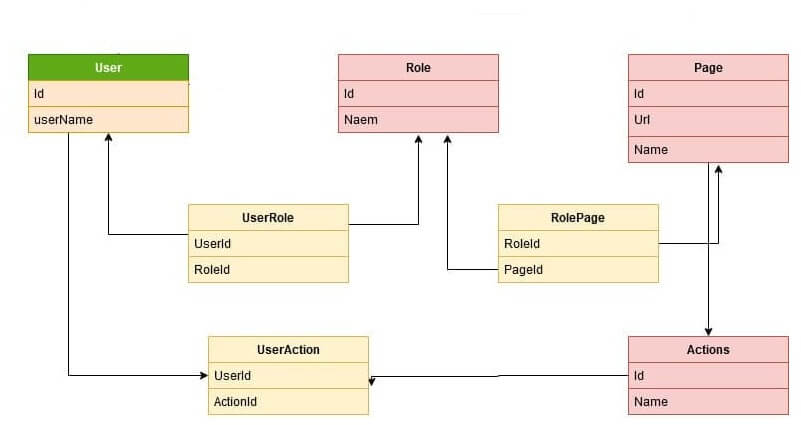
The following diagram is the AUA default authentication structure .
How to use WebApiAuthorize
To use WebApiAuthorize, you need to add an item for each control or action in EUserAccess enum. In the database inside the UserAccess table we added the name, access number , description and URL.
public enum EUserAccess
{
    [Description("User Management")]
    AppUser = 1,

    [Description("Access level management")]
    UserAccess = 2,

    [Description("Role management")]
    UserRole = 3,

    [Description("Role-level access management")]
    UserRoleAccess = 4,
}
Then you need to write it for the controller or action. For example, the following action is accessible only for users who have access to AppUser = 1.
[WebAuthorize(EUserAccess.AppUser)]
public async Task<IActionResult> _Insert(AppUserDto appUserDto)
{
    await _appUserService.InsertAsync(appUserDto);
    return RedirectToAction("Index");
}
Also you can use the following structure, which is simpler.
Access Levels in youtube More videos
Access Levels in youtube More videos